2004-2009 Mazda3 (BK)
|
European-spec Oil
Cooler how-to
by Edwin Man
|
2010-
Mazda3 (BL)
|
| 2005-2010 Mazda5 |
(CR)
Gen. Market
|
2003-2008 Mazda6 (GG)
|
2009-
Mazda6 (GH)
|
2007-
Mazda8 (LY)
|
Copyright © 2009-2010 Edwin Man. All rights reserved. No
reproduction by any means permitted.
The following are instructions on installing the
European-spec oil cooler into a 2004-2009 Mazda3 (with
the LF 2.0L and
L3 2.3L engines), 2010 Mazda3 (with the LF 2.0L and L5 2.5L engines),
2005-2010 Mazda5 (with the LF 2.0L engine in the general market), 2003-2008
Mazda6
(with the L3 2.3L engine), 2009 Mazda6 (with the L5 2.5L
engine), and the 2007+ Mazda8 (with the L3 2.3L engine).When Mazda did
a facelift update on the Mazda3 in
2007, they added an engine oil cooler to the European version due to
high engine oil temperatures from high speed driving in Europe. High
oil temperatures causes it to break down and the deteriorated oil can
lead to engine damage. It is likely that because of this, there were
numerous engine problems in the pre-face lift version of the Mazda3 in
Europe (and other hot climate countries). The Middle East and Mexico
also received this oil cooler for the 2007-2009 Mazda3. The
European/Mexican/Middle Eastern Mazda6 2.0L/2.3L always had an oil cooler but the
US/Canada Mazda3/Mazda6 (except for
MazdaSpeed3/MazdaSpeed6/2010 Mazda3 & CX-7 2.5L Manual) and general
market
Mazda5 did not come with engine oil coolers due to
cost cutting
efforts, a milder climate and perceived lower speed driving.
Installation of this oil cooler will improve engine reliability and
enhance oil life.
This how-to will also convert your cartridge oil filter (if you have a
2.3L L3-VE engine and early 2.5L L5-VE engine) to a spin-on oil filter
in the process. If you
choose to keep the cartridge oil filter, you may substitute the
appropriate part during this process.
Required time: 1-2 hours
Difficulty: slightly advanced
Application: 2004-2009 Mazda3 with 2.0L LF and 2.3L L3
engines, 2010+ Mazda3 with 2.0L LF and 2.5L L5 (AT only) engine, 2005-2010
Mazda5
(General Market) with 2.0L LF or 2.3L L3 engines, 2003-2008
Mazda6 (US/Canada) with
2.3L L3 engine, 2002-2007 Mazda6 (General Market) with 2.0L
LF and 2.3L L3 engines, 2008+ Mazda6 (General Market) with 2.0L LF and
2.5L L5 engines, 2009+ Mazda6 (US/Canada)
with 2.5L L5 engine, 2007+ Mazda8
with 2.3L L3 engine
Required tools:
- 10mm 6 point 3/8" drive socket
- 15mm 6 point 3/8" drive socket
- 24mm 6 point deep well 3/8" drive socket
- 3/8" socket wrench
- 3" 3/8" socket extension
- 17mm box or combination wrench
- oil filter wrench (use Mazda AKS75140 if removing original
cartridge filter cover)
- pliers
- 3/8" drive ft-lbs/N·m torque
wrench
- short flat blade screwdriver
- jack stands
- floor jack
- drain bucket for coolant
- drain bucket for oil
- brake cleaner
- rags/paper towel
- coolant funnel
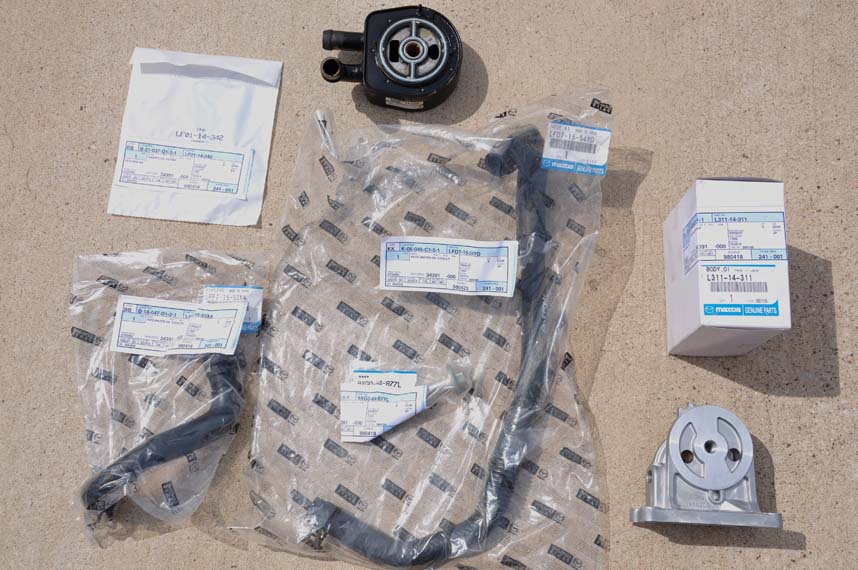
2004-2009 Mazda3 with Automatic Transmission Required parts:
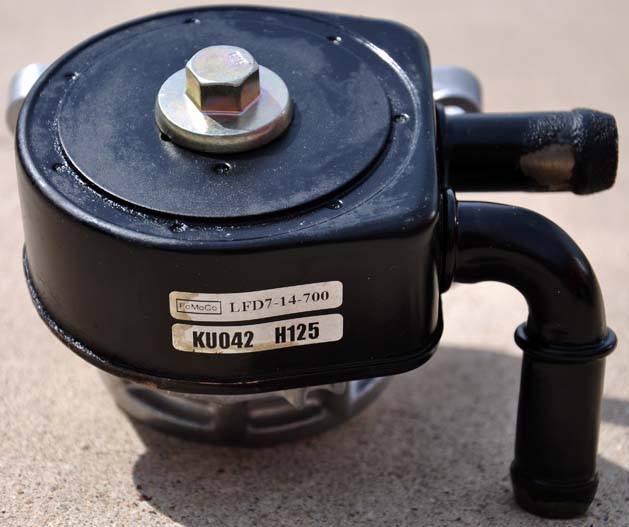
- LF6W-14-700A (or older LFD7-14-700) oil cooler
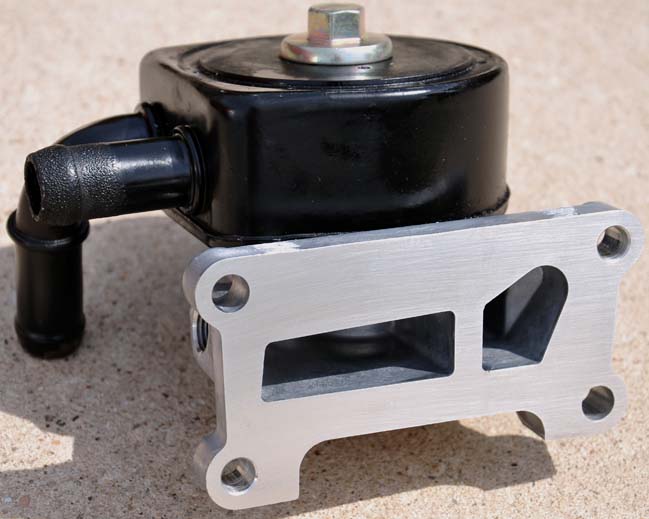
- L311-14-311A spin-on oil filter mount (or LF03-14-310B for
cartridge oil filter mount)
- LFY1-14-302 spin-on oil filter (or L321-14-302 for
cartridge oil filter) or aftermarket oil filter of your choice
- LF9V-14-789 (or 9XG0-64-877L when using LFD7-14-700) bolt
- LF01-14-342 gasket
- LFD7-15-54YD oil cooler to thermostat housing coolant return
hose
- LFF7-15-53XA AT oil cooler to engine oil cooler hose
- 9956-41-400 drain plug crush washer
- gray silicone sealant (or Mazda sealant 8527-77-739)
- Mazda non-silicate "Long Life" green coolant
(0000-77-501E-02 in the US or 0000-88-AFLG in Canada) or Mazda FL22
(0000-77-508E-20 in
the US or 0000-88-AFFL-22 in Canada) coolant for cars built on/after
December 1, 2007 (VINs
greater than JM1BK****8*864673 or JM0BK******390650 or JM6BK******390650
or JM7BK******390650)
- It is important to use the correct coolant for your
vehicle. Use of aftermarket coolant may cause cooling system damage and
is not recommended! Not all coolant are the same!
- 5 US quarts/litres motor oil
- distilled water (not for
FL22!!!)
If parts availability is an issue or if you are on budget, you may buy
some of the necessary parts from a Ford dealership. Note that the Ford
equivalent parts are domestically made and not Japanese made.
Mazda/Ford part number interchange reference
|
Mazda
|
Ford
|
Description
|
L311-14-311
|
3S7Z-6881-AA
|
SPIN-ON OIL
FILTER MOUNT
|
LF03-14-310A
|
1S7Z-6881-AA
|
CARTRIDGE
OIL FILTER MOUNT
|
LF05-14-302A
|
1S7Z-6731-DA
|
SPIN-ON OIL FILTER
|
L321-14-302
|
3M4Z-6744-AC
|
CARTRIDGE OIL FILTER
|
LF01-14-342
|
1S7Z-6840-AA
|
GASKET
|
9XG0-64-877L
|
W706487-S437
|
BOLT
|
Basic disclaimer: work carefully and take your time. If you screw
up, it's your fault. If you don't have some mechanical experience,
please have a professional install this oil cooler for you! This
installation is definitely not for beginners! This
how-to assumes you know how to change your own oil! Hot engine oil and
coolant WILL burn! Ensure the engine is cool before working!
This how-to was written using an
automatic transmission Mazda3,
however it is not much different from a manual transmission Mazda3/Mazda5.
There are cooling system differences in the Mazda6/Mazda8 that will not
greatly effect the use of this how-to.
- Raise vehicle and set it on jack stands
- Remove engine under cover
- Drain the oil and remove the oil filter (if you don't know how to do
this, stop right here and have a professional do this installation for
you!). Be sure to install a new drain plug crush washer.
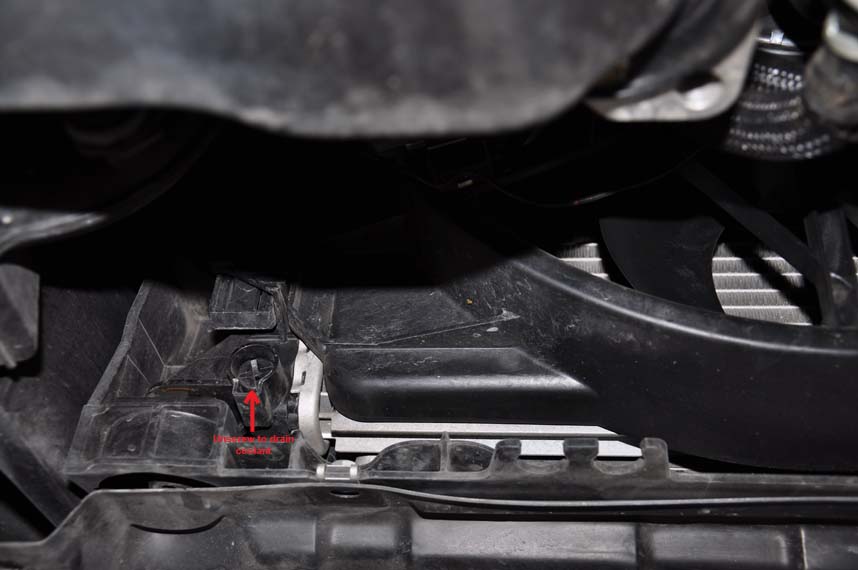
- Locate coolant drain cock at the bottom left corner of the radiator.
Use a short flat blade screwdriver to loosen the drain cock to drain
the engine coolant.
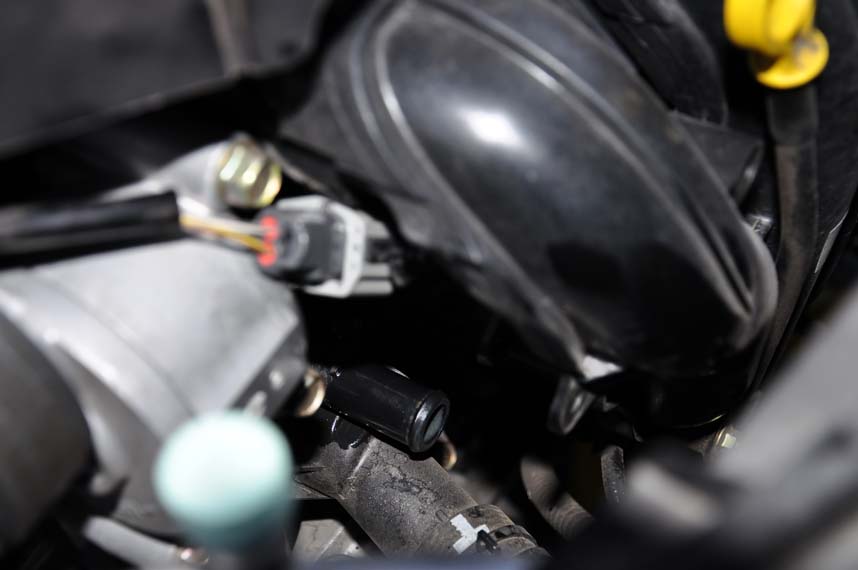
(Mazda3 shown)
- Disconnect the oil pressure switch installed on the oil filter
housing and remove it using a 24mm deep socket
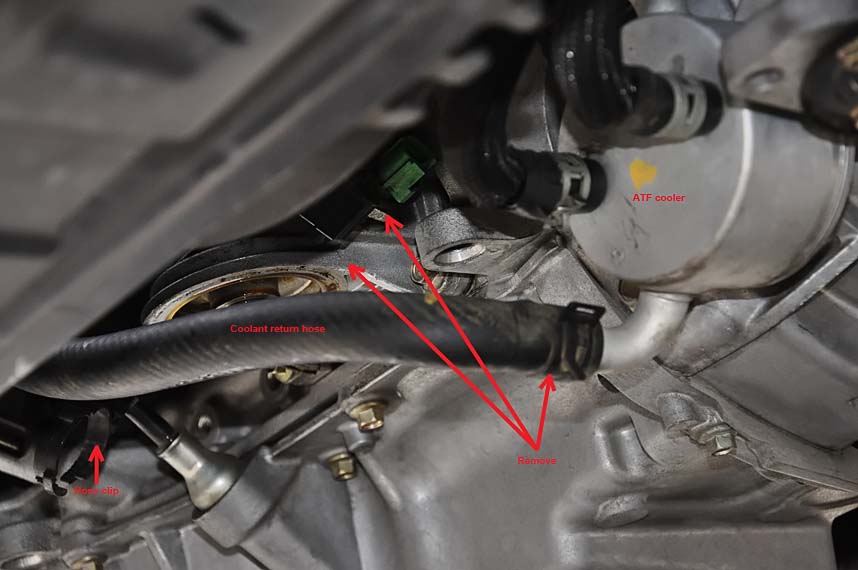
- On 2003-2005 models unclip the
coolant return hose attached to the dipstick tube and discard clip (it
will not be reused). On 2006 and newer engines, unclip the coolant return hose attached to a bracket on the lower engine
block. Unbolt this bracket also and discard the bracket with clip (it
will not be reused).
- Unclamp the lower end of the coolant return hose from the AT oil cooler and disconnect it. Careful!
Trapped coolant
may spill, so keep a bucket underneath
it!
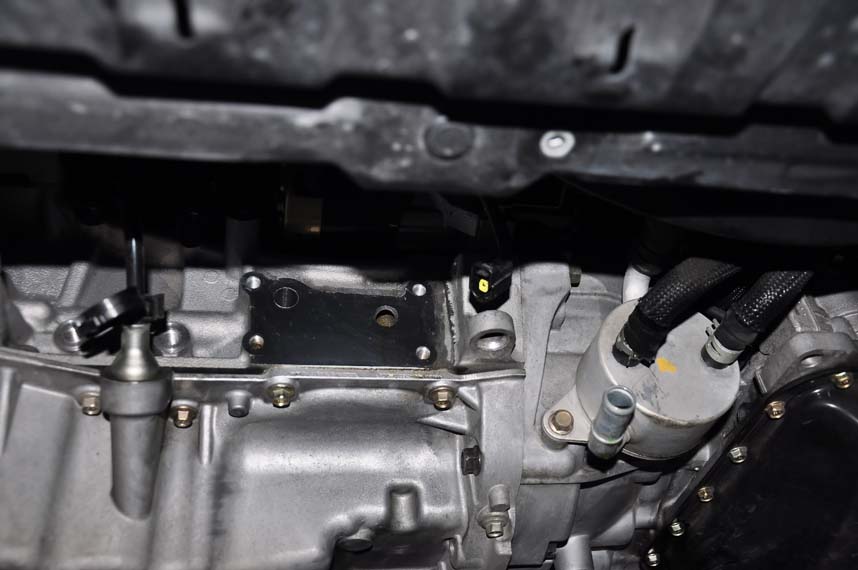
- Remove the original oil filter mount with a 10mm socket and 3"
extension. (Automatic transmission Mazda3 shown)
- Follow the coolant return hose up to the thermostat housing and
locate knock sensor connector. Unclip (but not disconnect) knock sensor
connector and wiring from the intake manifold. Move the wires out of
the way.
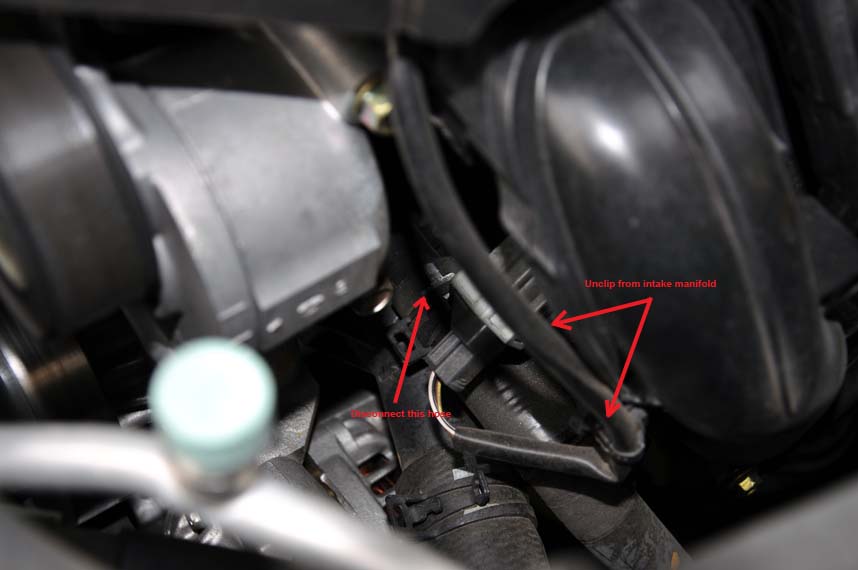
- Unclamp the upper end of the same coolant return hose and remove it.
This hose will no longer be used.
- Use brake cleaner and a rag to clean any spilled oil on the engine
block and the oil filter mount gasket area. (Automatic transmission
Mazda3 shown)
- Wet the oil cooler gasket with CONVENTIONAL motor oil
- Align the protruding pin at the bottom of the oil cooler with
alignment hole at the back of the oil filter mount. Failure to do this
may result in oil leaks and/or oil starvation leading to engine damage!
- Install LF9V-14-789 or 9XG0-64-877L bolt through the
middle of the oil cooler to the oil filter mount and torque to 27.50 ft-lbs (or 37 N·m) (torque to 25.50
ft-lbs or 34.50 N·m when using 9XG0-64-877L bolt) with a 15mm socket as shown.
- Install the shorter coolant hose (LFF7-15-53XA) to the straight nipple on the oil
cooler. Align painted mark on top of the coolant hose to be perpendicular to
the top of the oil cooler. The protective sleeve end of the hose is the
end that goes to the oil cooler. The clamps that come with the new hose
are already properly positioned, so just squeeze them to unlock them
and clamp them into place.
- Align new oil filter mount gasket and install the
oil filter mount assembly to the engine block reusing the original 10mm
bolts. The gasket will only go on one way. Torque the 10mm bolts to
18.50 ft-lbs (or 25 N·m) in a cross
pattern sequence.
- Clean the threads of the oil pressure switch but
ensuring nothing gets into the switch itself.
- Apply a small amount of silicone sealant to the oil pressure switch
threads as shown. Ensure there is no sealant 1mm from the end of the
threads.
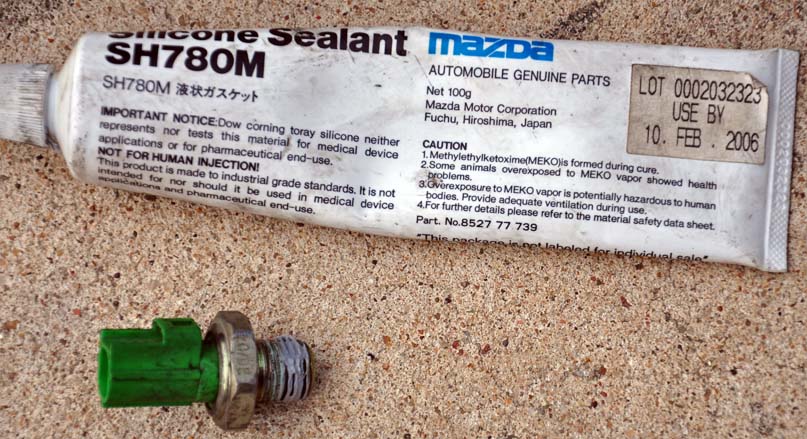
- Install oil pressure switch
to the new oil filter mount using a 24mm deep socket. Torque to 11 ft
lbs (or 15 N·m).
- Connect the other end of the short coolant hose to
the AT oil cooler. Follow the painted mark to align the hose
straight. The clamps that come with the new
hose are already properly
positioned, so just squeeze them to unlock them and clamp them into
place.
- Install long coolant return hose to the
thermostat housing. Align the hose with the top of the thermostat
housing using the painted mark. The clamps that come with the new hose are already properly
positioned, so just squeeze them to unlock them and clamp them into
place.
- Reinstall knock sensor wiring where they belong. Do NOT forget to do this or the wiring may get damaged!
- Install the "J" shaped end of the coolant return
hose to the remaining nipple (the one pointing downwards) on the oil
cooler. The clamps that come with the new
hose are already properly positioned, so just squeeze them to unlock them and clamp them into
place.
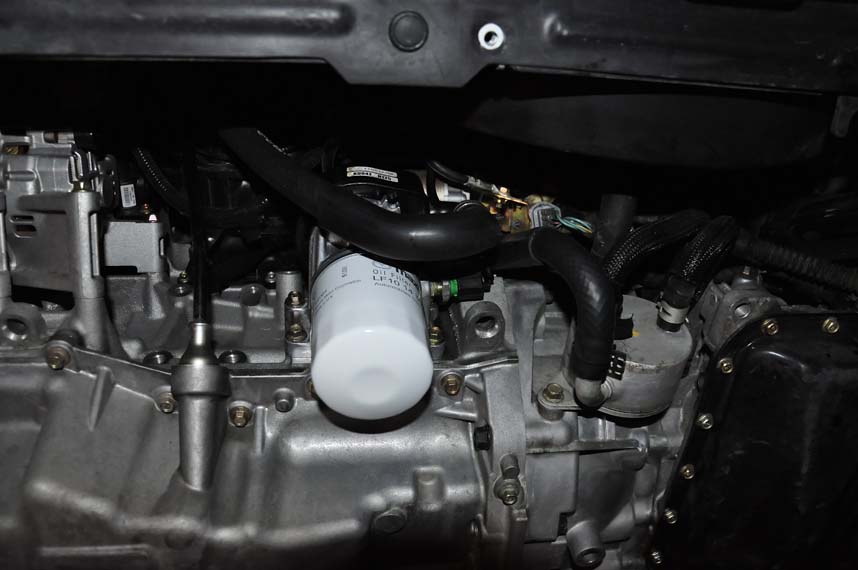
- Fill a new oil filter with some oil (if using spin
on filter) and wet the oil filter gasket with some motor oil. Install
oil filter. Reconnect the oil pressure switch.
- Oil cooler installation is now complete. (Automatic transmission
Mazda3 shown)
- Refill the engine with 4.5 US quarts (4.3 litres) of oil
- Tighten the coolant drain cock and refill coolant through the
reservoir tank (on the right side of the engine bay) using 50% mix with
distilled water (or straight with FL22; do NOT mix water with FL22!).
Squeeze the lower radiator hose to purge any air bubbles if necessary.
- Start engine and check for leaks.
- Allow engine to warm up then run the engine at 2500 rpm for 5
minutes.
- Run the engine at 3000rpm for 5 seconds. Repeat this four to five
times.
- Check coolant level and top off to the "FULL" mark if necessary.
Reinstall coolant reservoir cap. Cap should "click" in place after the
final turn. It may take some driving and a few days for the coolant
level to settle. Check the coolant level for a few days and top off if
necessary.
- Shut off engine and reinstall engine under cover.
- Remove jack stands and put vehicle back on the ground.